PRODUCT DEVELOPMENT
How to develop a new product: from idea to production
From the brief to prototypes and manufacturing decisions: a practical guide to getting started and preparing for a conversation with a designer.
Where should you start? Developing a new product begins with defining the need it addresses, the people who will use it and the constraints of the project. Research, concepts, prototypes and testing then help you choose a solution and prepare it for production.
The stages are not a rigid sequence: materials, quantities and test results may lead you to revisit earlier decisions.
1. Define the problem before the form
A new product may start with an observed need, an object to improve or a collection to expand. Before drawing it, you need to clarify the intended outcome and why someone would choose it.
The brief brings this information together and provides a reference for the work. It does not need to contain every answer: it should make priorities explicit and distinguish essential requirements from areas still to explore.
- Users and context: who will use the object, where and with what needs?
- Functions: what should it enable people to do, and which difficulties should it solve?
- Market and distribution: what alternatives exist, and through which channels will it be sold?
- Constraints: what quantities, selling price, resources and deadlines are envisaged?
If you have not organised this information yet, Shape your idea helps you prepare an initial document to share with the designer.
2. Study people, objects and the market
Research tests the assumptions in the brief. Observing how existing products are used, comparing competing solutions and examining recurring difficulties helps identify where the design can offer a tangible advantage.
This does not always require a new function. A more intuitive gesture, a more comfortable grip, easier cleaning or a replaceable component can become the starting point.
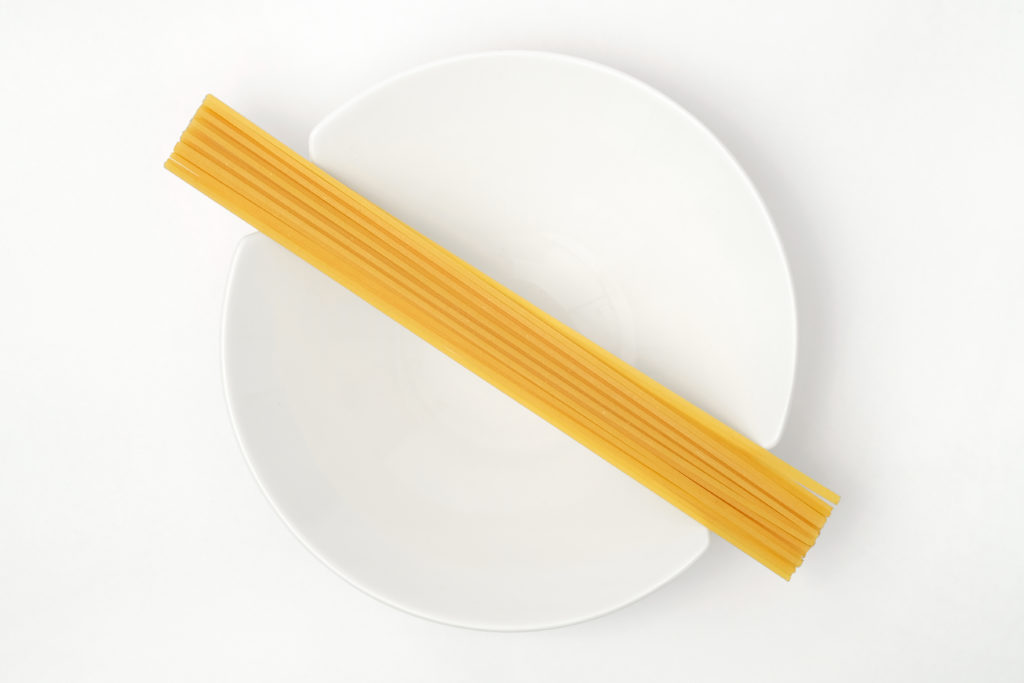
An example: 80 Grammi
The 80 Grammi plate connects two moments of a meal: measuring spaghetti and serving it. V-shaped notches in the rim measure a portion of approximately 80 grams, while the plate holds the pasta once cooked. It shows how an everyday gesture can suggest a function integrated into an object’s form.
3. Explore solutions and choose a direction
Sketches, physical models and three-dimensional representations help compare different answers to the same problem. At this stage, the concept describes the product’s underlying idea: how it works, how it is used, its presence and its relationship with the brand.
The choice should not depend only on the most convincing image. Each proposal needs to be assessed against the brief: usefulness, ergonomics, recognisability, feasibility and expected cost. Record both the reasons for the choice and the aspects that still require testing.
Form and gesture: Tritatauro
In the Tritatauro mortar, the crescent-shaped tool and white Carrara marble base define a different way of processing ingredients. The ends inspired by a bull’s horns become handholds. Function and visual identity are expressed through the same element, rather than treated as separate problems.
4. Consider materials, quantities and processes together
A material is more than a finish selected at the end. It affects weight, strength, feel, maintenance and manufacturing possibilities. It must be assessed alongside geometry and the production process.
Quantities also influence decisions. An investment in tooling may be difficult to justify for a small batch, but carry a different weight when spread across many units. Unit cost therefore needs to be considered alongside initial investment, timing and realistic volumes.
During development, discuss components, assembly, finishes and manufacturing challenges with suppliers. A geometry that looks promising on screen must be reproducible at the required quality.
5. Build a prototype to answer a question
A prototype is useful when we know what we want to test. A model for checking size does not necessarily need the final material; a strength or functional test requires properties appropriate to the test.
There are form models, functional prototypes and samples closer to the final product. 3D printing, CNC machining and other techniques are tools chosen for a particular check, not compulsory steps in every project.
A prototype does not automatically demonstrate that a design can be manufactured in series. Materials, tolerances and processes may differ. A test needs clear criteria: what to observe, what result is acceptable and what changes to introduce.
Testing may lead to revisions to a grip, wall thickness, fit or number of components. Part of a prototype’s value lies in revealing a problem while it can still be corrected.
6. Prepare the move into production
Once the direction is established, the design needs further development with the technical and manufacturing specialists involved. Drawings, materials, tolerances, assemblies and samples become references for making the product.
Responsibilities must be agreed: design, engineering, tooling and specialist checks may be assigned to different parties. The scope of work should specify the activities and deliverables included and who approves each stage.
A pilot production run, where planned, allows the actual process to be assessed: assembly, finishes and repeatability. Any conformity checks depend on the product category and target markets and need to be considered in the plan.
How much time and money should you allow?
No single duration or price applies to every product. Component count, novelty, supplier availability, tooling, testing and revisions can significantly change the process.
When assessing a quote, distinguish design, prototypes and tests, tooling and production. These are separate costs: the designer’s fee is not the total investment required to bring a product to market.
A clear proposal sets out objectives, stages, deliverables, included revisions, exclusions and approval points. If key information is missing, an initial analysis phase may be appropriate before defining the entire development programme.
Do I need technical drawings before speaking to a designer?
No. A problem to solve, a sketch or a reference product may be enough for an initial conversation. Information about users, functions, expected quantities and commercial objectives is particularly helpful.
Do I need to choose the material straight away?
Not always. If it is a fixed requirement, include it in the brief. Otherwise, assess it alongside use, form, quantities and manufacturing process, comparing alternatives before deciding.
What is the next step?
Collect the information you have and clearly identify what remains uncertain. Use our guided brief tool or explore the studio’s projects to see how form, function and materials come together in different objects.